Happy Holidays!
Friday, December 30, 2011
Grampy's Moose Quilt
Here is my grandfather cuddled in his new quilt, he was excited that he got the quilt instead of my grandmother getting the quilts all the time.
Sunday, December 25, 2011
Moose Quilt
A quilt shop from Grand Marais had brought a sample of a rag flannel quilt to display at their booth during our guild quilt show which I ended up buying a kit for it when I was passing through Grand Marais.
I started this quilt on a Sunday a week before Christmas thinking I should make it for my Grandfather as I had not found a gift to give to him for Christmas. That Sunday I did power quilting all day.
This is what I got accomplished that Sunday, I still had a long way to go. It was made from really good flannel, thick and soft.
The next day I carried on when I got off work and finished another good chunk of it.
I used my new machine and used the blanket stitch to secure the moose and the trees, I have never had the blanket stitch on my old machine and this just finished it off.
I laid it out on the floor and then began to sew the rows together.
I sewed all the rows together and this is the worst part because I have to cram the blanket into that tiny space in the machine between the needle and the motor.
I also had to applique the antlers of the moose down so I also had to turn the blanket around and around within that tiny space.
I finished the quilt on Christmas Eve and wrapped it without taking a picture of it, I will post a finished picture of it when my grandfather opens it on the 29th.
I washed it 3 times to fray the edges and it frayed really well.
Bauble Christmas
Merry Christmas everyone, this year I made a short list of sewing projects to do as Christmas gifts. I had seen a picture of bauble wreaths on the Internet and thought, I would try one. A friend of mine had moved into a new house and I thought what a great gift to give her.
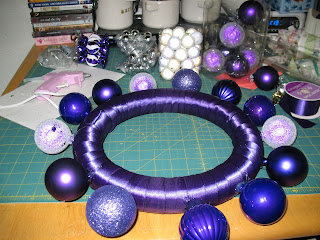
I started with a foam wreath from the craft store and wrapped purple ribbon around it, this is her favorite colour.
I bought many different purple baubles and some co-ordinating colours and started with a few around the perimeter of the foam ring.
I then started to fill in the holes with the rest of my big purple baubles, I attached the baubles with my most universal little pink glue gun. That glue gun comes in handy all the time for many projects.
I worked on one side with the bigger baubles and then flipped it over to finish the other side.
When attaching the baubles to the wreath base, the top of the bauble where you attach the hook to hang it is removed giving a flat surface to glue to the foam wreath.
The smaller co-ordinating baubles I used as space fillers. I tied a wide purple ribbon around the wreath and secured it in place with my trustee glue gun. The wreath I thought would be heavy but it is quite lightweight, plastic baubles are very light.
Here is how I started, with a cooling rack and some parts used to make jewelry, I tried to eye ball the shape of a tree and this is where it didn't quite work out.
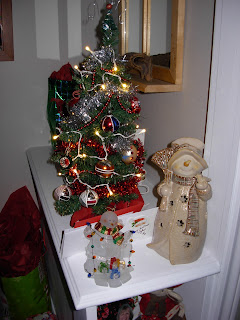
Not quite the shape of a tree but I hung it anyways and picked up a tiny Christmas tree also.
I started with a foam wreath from the craft store and wrapped purple ribbon around it, this is her favorite colour.
I bought many different purple baubles and some co-ordinating colours and started with a few around the perimeter of the foam ring.
I then started to fill in the holes with the rest of my big purple baubles, I attached the baubles with my most universal little pink glue gun. That glue gun comes in handy all the time for many projects.
I worked on one side with the bigger baubles and then flipped it over to finish the other side.
When attaching the baubles to the wreath base, the top of the bauble where you attach the hook to hang it is removed giving a flat surface to glue to the foam wreath.
The smaller co-ordinating baubles I used as space fillers. I tied a wide purple ribbon around the wreath and secured it in place with my trustee glue gun. The wreath I thought would be heavy but it is quite lightweight, plastic baubles are very light.
Here is the final project!
I do get ideas from pictures on the Internet, this one did not quite turn out quite how I planned it but you can't win them all. I wanted to make a bauble Christmas tree and the picture I saw of it looked amazing, mine not so much.
Not quite the shape of a tree but I hung it anyways and picked up a tiny Christmas tree also.
Merry Christmas and Happy Holidays!
Friday, December 9, 2011
Craft Shows
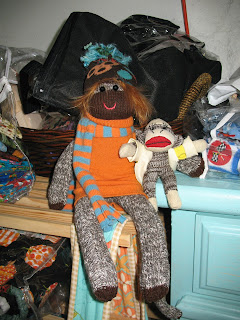
My Mom and I went to the Local crafts shows and I came home with a few critters to add to my collection. Last year a friend bought me a little sock monkey for Christmas and I found him a friend.
A lady at the craft show was selling sock monkeys she had made and this particular one jumped out at me, she is just so unique.
I also brought home one of these great mice to join the one I had got last year and put in the center of a wreath I made,
I do like to make my own Christmas Crafts but it is so much fun to enjoy other peoples talent.
Have a great Holiday.
Holidays Approaching
Wow I cannot believe that I have not posted since November, with the holidays quickly approaching I am making the mad dash to the finish line trying to get all of my Christmas crafting done, this is what my sewing room looks like at the moment..
I have different projects piled on top of each other in an organized chaos, and then I think of another project I would like to start and pile it on top.
I had previously posted that I made witch towels for Halloween, tah dah here are Santa towels..
I have different projects piled on top of each other in an organized chaos, and then I think of another project I would like to start and pile it on top.
I had previously posted that I made witch towels for Halloween, tah dah here are Santa towels..
I have a few projects on the go including my new style of Christmas tree, I saw it online and thought I can do this. Here is my start at it, I will post the final product.
As you can probably tell I don't plan on having a traditional Christmas tree, I put the tree on the wall last year and pinned lights to the wall with garland as well.
Stay Tuned for the final tree after I dig myself out of the crafts that are piling up.
Merry Christmas Everyone
Saturday, November 5, 2011
Selvage, Selvage, Selvage
I have been collecting selvage for awhile now and decided I should put them to good use, I have also recruited people to save their selvage (Thank You).
I started with a little pile and then it grew to this basket.
Here is the finished little square, I will give you a sneak peak at one of the larger blocks finished.
Now you will just have to sit tight to see the finished quilt...................
I started with a little pile and then it grew to this basket.
I just cannot believe that I can make a quilt out of the selvage that I either cut up and threw away or cut off and threw away. I paid for it I might as well use it.
I googled selvage quilts and found a pattern that I thought suited my personality.
Because I was making my squares the same I was able to take advantage of chain sewing.
I did 4 squares at a time because the finished square is four small squares put together, this will all make sense in a second.
This is one of the little squares that makes up the larger squares, can you believe it this is made from selvage. I think this is my most favorite scrap quilt. Here is the finished little square, I will give you a sneak peak at one of the larger blocks finished.
Now you will just have to sit tight to see the finished quilt...................
Monday, October 31, 2011
Twister Quilt Completed
I quilted it with all over swirls which has been my new pattern of choice, I usually just meander the whole thing.
I had bought the pumpkin material last year after Halloween and bought the rest of the bolt knowing that I would find a use for it, it is so cute with the mice noses sticking out from behind the pumpkins.
I had bought a whole pile of minky fabric during a sale and decided I would put brown on the back, this quilt would make the perfect couch blanket. I have one that is so comfortable to just curl up with because it is so soft on the back.
I do realize that this post is for Oct 31/11 and the label reads Nov 2011, when I finished it yesterday I was a few days ahead of myself when writing the label.
Try the new twister ruler it is a great tool which has awesome results, whether you use a charm pack or scrap squares, you will be shocked with the results, you never know what you will get until it's finished.
Saturday, October 22, 2011
Twister Top
This is a continuation from Alva's Twister class. I finished the top of the wall hanging I expanded.
It sits on my basement floor where it is waiting to be samdwhiched.
I added the pumpkin fabric for the borders, I think it's so cute with little mice poking out from behind the pumpkins.
It sits on my basement floor where it is waiting to be samdwhiched.
I added the pumpkin fabric for the borders, I think it's so cute with little mice poking out from behind the pumpkins.
Friday, October 7, 2011
Alva's Twister Class
The other day I took a twister class called Square Dance taught by Alva, at one of our local quilt shops. Have you ever seen this ruler...
This ruler looks so simple but what an impact the results make.
This is what I started with, random scrap 5X5 squares, sewn together in rows.
Some people used a charm pack which gave it more of matchy look between the fabrics. If you have read my previous posts, I had bought a few metres of Mr. Wiskers fabric and was waiting to find a use for it......I found it. So then I added the borders.
Then with this fancy twister ruler and Alva guiding us along, this is what transpired.
I would have never guessed that this is what was going to come of the fabrics that I had choosen. I took it home and finished it today.
Now I could just leave it as a wall hanging but I personally have no use for a wall hanging so I have BIG plans for this. Updates to follow......................
Wednesday, October 5, 2011
Witch Towels
I found this pattern for these cute witch towels on the Baby Lock website, they are very easy and nice as a little gift for someone.
You could use bathroom towels
or kitchen hand towels.
You can add all kinds of decorations to them, make a few and make them all different. I picked up many different Halloween ribbons, and some with sparkle.
Aren't they cute with the witches boots hanging off the bottom. You can print the pattern from the Baby Lock website, it is really easy to do.Happy Halloween.
Subscribe to:
Comments (Atom)


